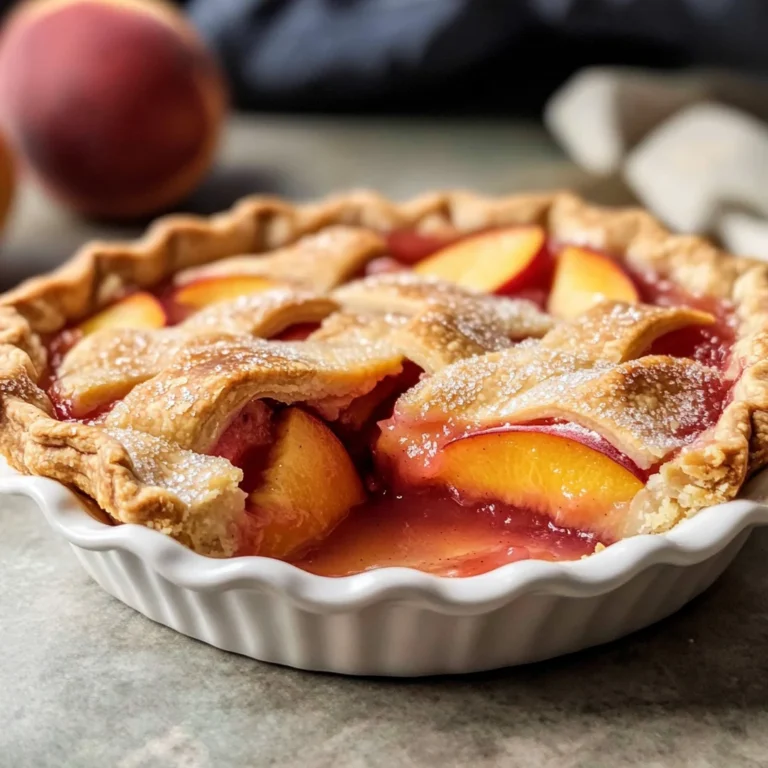
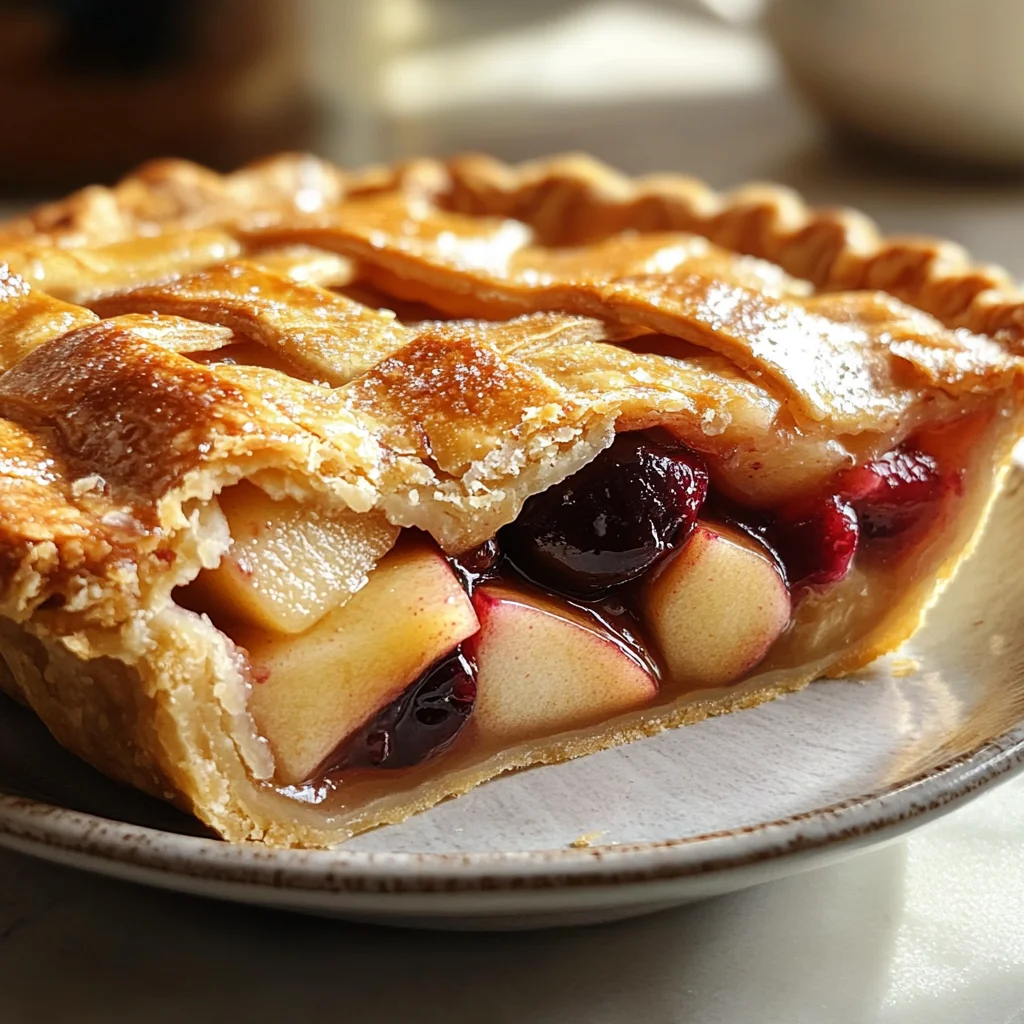
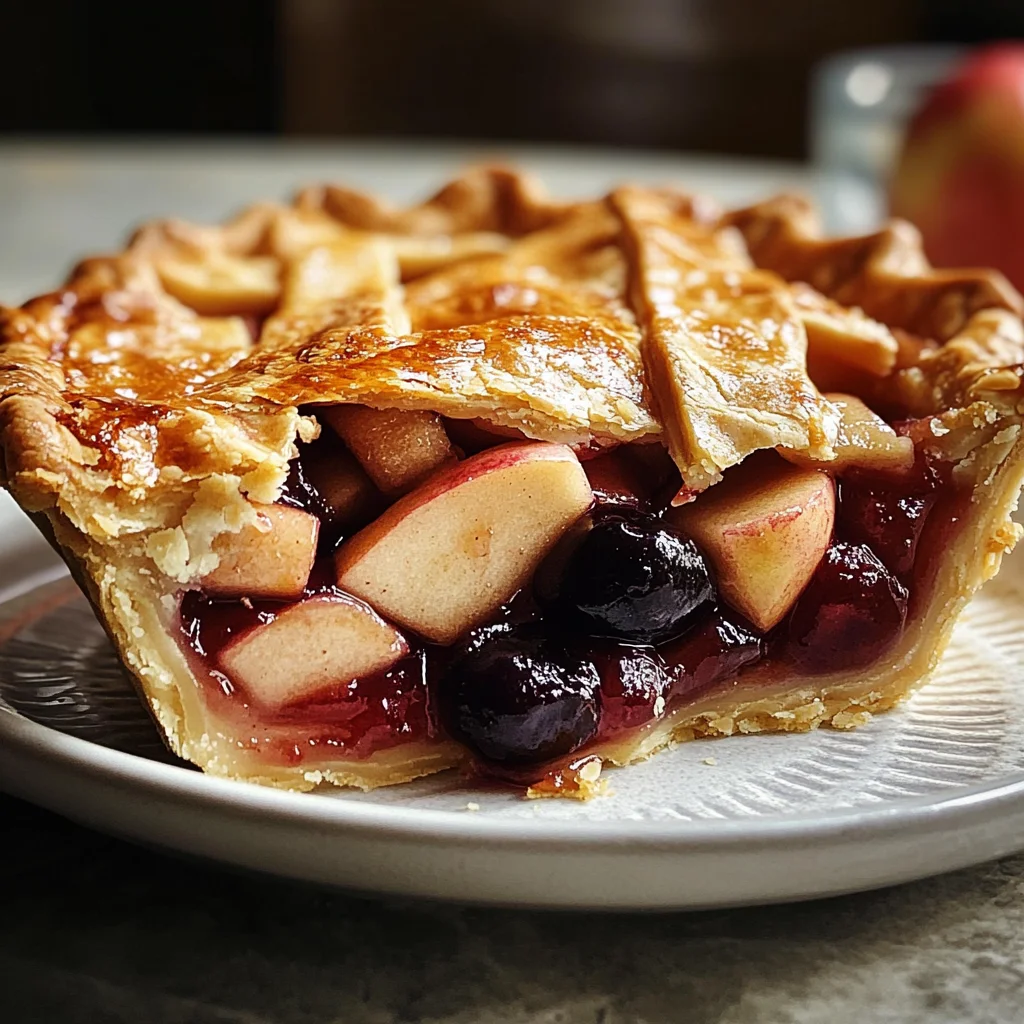
Cherry Apple Pie
This Cherry Apple Pie is a delightful twist on the classic dessert. Featuring a crispy, flaky crust paired with a sweet and tangy filling of cherries and apples, it’s perfect for any occasion—be it a family gathering, holiday feast, or a cozy weekend treat. The combination of flavors and textures makes this pie stand out, ensuring everyone will love each slice!
Why You’ll Love This Recipe
- Delicious Flavor: The blend of tart cherries and sweet apples creates a mouthwatering taste that satisfies every sweet tooth.
- Easy to Make: With straightforward steps and simple ingredients, this recipe is accessible even for novice bakers.
- Versatile Dessert: Enjoy it warm with ice cream or at room temperature as an afternoon snack. It fits any mood!
- Impressive Presentation: The golden crust and vibrant filling make this pie a showstopper at any gathering.
- Perfect for Sharing: Bake it for family dinners, potlucks, or just to enjoy with friends; it’s sure to be a hit!
Tools and Preparation
Preparing your Cherry Apple Pie is easier with the right tools. Make sure you have everything ready before diving into the recipe.
Essential Tools and Equipment
- Mixing bowl
- Rolling pin
- Pie dish
- Knife
- Measuring cups and spoons
Importance of Each Tool
- Mixing bowl: A spacious bowl allows you to mix ingredients thoroughly without spills.
- Rolling pin: This tool helps achieve an even thickness in your pie crust for perfect baking.
- Pie dish: A good quality pie dish ensures even cooking and easy serving.
Ingredients
For the Pie Crust
- 340 g all-purpose flour
- 1 teaspoon salt
- 230 g unsalted butter (cold & cubed)
- 140 g ice cold water
For the Filling
- 4 tart apples (about 700g after peeled, cored, and sliced)
- 300 g red cherries (pitted & halved)
- 50 g brown sugar
- 20 g cornstarch
- 1 tablespoon ground cinnamon
- 2 teaspoons vanilla extract
For Topping
- 1 egg (beaten)
- 2 tablespoons sugar crystals or coarse sugar
How to Make Cherry Apple Pie
Step 1: Prepare the Pie Crust
Start by combining the flour and salt in a mixing bowl. Add the cold cubed butter and use your fingers or a pastry cutter to blend until you achieve a crumbly texture. Gradually add ice-cold water until the dough holds together. Wrap in plastic wrap and refrigerate for at least 30 minutes.
Step 2: Make the Filling
In another bowl, mix the sliced tart apples with pitted cherries. Add brown sugar, cornstarch, ground cinnamon, and vanilla extract. Stir gently until all fruit is coated evenly.
Step 3: Roll Out the Dough
After chilling, roll out half of the dough on a floured surface to fit your pie dish. Carefully transfer it into the dish without stretching.
Step 4: Assemble the Pie
Pour the cherry apple filling into the prepared crust. Roll out the remaining dough for the top layer. You can create a lattice pattern or simply cover it flat.
Step 5: Bake
Preheat your oven to 180°C (350°F). Brush the top crust with beaten egg and sprinkle with coarse sugar. Bake for about 70 minutes until bubbly and golden brown.
Enjoy your delicious Cherry Apple Pie fresh from the oven!
How to Serve Cherry Apple Pie
Serving cherry apple pie can elevate your dessert experience. Whether you’re hosting a dinner party or enjoying a quiet evening at home, presenting this delightful pie in various ways can make it even more special.
A La Mode
- Serve with a scoop of vanilla ice cream on top. The creamy texture complements the warm pie perfectly.
Whipped Cream
- Add a generous dollop of freshly whipped cream. It enhances the sweetness and adds a light, airy contrast.
With Caramel Sauce
- Drizzle warm caramel sauce over each slice. This adds a rich flavor that pairs beautifully with the cherry and apple filling.
Fresh Berries
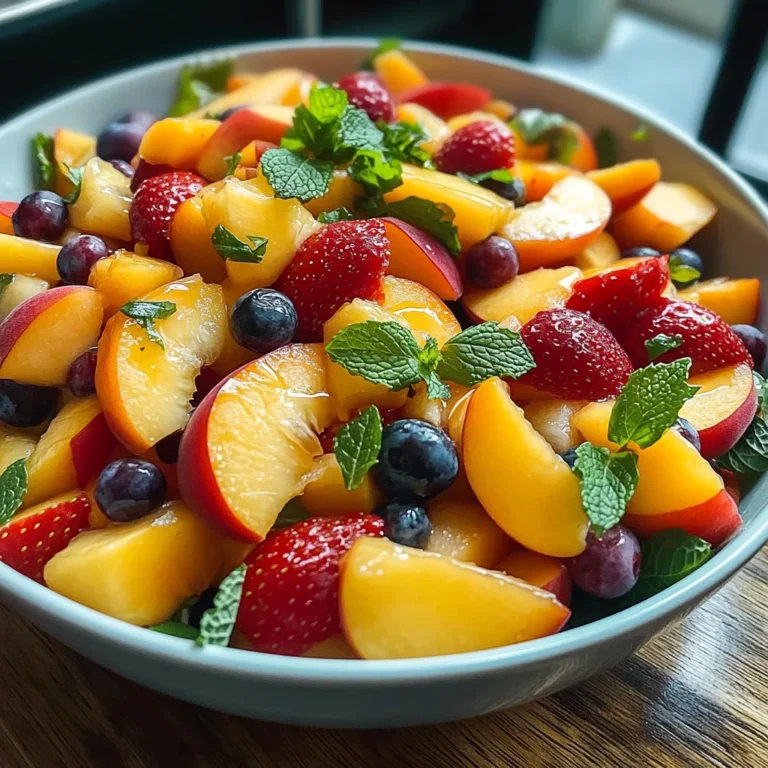
- Garnish with fresh berries such as raspberries or blueberries. They add a pop of color and an extra fruity element to your dessert.
How to Perfect Cherry Apple Pie
Perfecting your cherry apple pie can make all the difference in taste and presentation. Here are some essential tips to help you achieve the best results.
- Use cold ingredients – Keeping your butter and water ice-cold will ensure a flaky crust.
- Don’t overmix the dough – Mix just until combined to avoid toughening the crust.
- Let it rest – Allow the pie crust to chill for at least 30 minutes before rolling out for better texture.
- Pre-bake if needed – If using a particularly juicy filling, consider pre-baking your crust slightly to prevent sogginess.
- Use a mix of apples – Combine sweet and tart apples for depth of flavor in your filling.
Best Side Dishes for Cherry Apple Pie
Pairing side dishes with cherry apple pie can enhance your meal. Here are some delicious options that complement this dessert wonderfully.
- Cheese Platter – A selection of cheeses, especially sharp cheddar, contrasts nicely with the sweetness of the pie.
- Vanilla Ice Cream – A classic pairing that brings creaminess to balance the tartness of cherries and apples.
- Coffee or Espresso – The rich flavors of coffee provide an excellent counterpoint to sweet desserts like cherry apple pie.
- Fruit Salad – A refreshing mix of seasonal fruits can cleanse the palate after enjoying pie.
- Nutty Granola – Sprinkle granola on top for added crunch and texture alongside your pie slice.
- Chocolate Sauce – A drizzle of chocolate sauce can satisfy any chocolate cravings while enhancing flavors.
Common Mistakes to Avoid
Making a cherry apple pie can be simple, but there are common pitfalls that can affect the outcome.
- Crust Errors: Using warm butter or not chilling the ingredients can lead to a tough crust. Always ensure your butter is cold and your water is ice cold.
- Too Much Filling: Overfilling the pie can cause it to spill over during baking. Stick to the recommended amounts for best results.
- Skipping the Chill: Not allowing the pie crust to chill before baking can result in shrinking. Be sure to refrigerate it for at least 30 minutes.
- Ignoring Oven Temperature: Baking at the wrong temperature may yield uneven cooking. Preheat your oven properly and use an oven thermometer if needed.
- Forgetting Egg Wash: Not applying an egg wash can lead to a dull crust. Brush your pie with beaten egg for a golden finish.
Storage & Reheating Instructions
Refrigerator Storage
- Store in an airtight container for up to 3 days.
- Keep the pie at room temperature for no more than 2 hours before refrigerating.
Freezing Cherry Apple Pie
- Wrap tightly in plastic wrap, then foil for up to 3 months.
- Thaw overnight in the refrigerator before reheating.
Reheating Cherry Apple Pie
- Oven: Preheat to 350°F (175°C) and bake for about 15-20 minutes until warmed through.
- Microwave: Heat on medium power for 1-2 minutes, checking frequently.
- Stovetop: Place slices in a skillet over low heat until warmed, covering with a lid.
Frequently Asked Questions
Here are some common questions about making cherry apple pie that many home bakers ask.
Can I use frozen cherries in Cherry Apple Pie?
Yes, you can use frozen cherries! Just thaw and drain any excess liquid before adding them to your filling.
What type of apples should I use for Cherry Apple Pie?
Tart apples like Granny Smith or Honeycrisp work best as they balance the sweetness of cherries.
How do I prevent my Cherry Apple Pie from being soggy?
To prevent sogginess, consider pre-baking the crust or using cornstarch in the filling to absorb excess moisture.
How long does Cherry Apple Pie last?
When stored properly, cherry apple pie lasts up to 3 days in the refrigerator and up to 3 months in the freezer.
Final Thoughts
This cherry apple pie combines sweet and tart flavors with a flaky crust, making it a delightful dessert option. You can customize it by adding nuts or spices according to your taste. Don’t hesitate; try this recipe today!
Cherry Apple Pie

Indulge in the delightful fusion of sweet and tart with this Cherry Apple Pie, a comforting dessert that redefines tradition. With its crispy, flaky crust enveloping a luscious filling of fresh cherries and crisp apples, this pie is perfect for any occasion—from family gatherings to quiet evenings at home. Not only does it boast a stunning golden appearance, but each slice promises a burst of flavor that will leave everyone craving more. Serve it warm with vanilla ice cream or topped with whipped cream for an elevated dessert experience. Whether you’re an experienced baker or just starting out, this easy-to-follow recipe will guarantee satisfying results every time.
- Prep Time: 30 minutes
- Cook Time: 70 minutes
- Total Time: 1 hour 40 minutes
- Yield: Serves 8 slices 1x
- Category: Dessert
- Method: Baking
- Cuisine: American
Ingredients
- 340 g all-purpose flour
- 1 teaspoon salt
- 230 g unsalted butter (cold & cubed)
- 140 g ice cold water
- 4 tart apples (about 700g after peeled, cored, and sliced)
- 300 g red cherries (pitted & halved)
- 50 g brown sugar
- 20 g cornstarch
- 1 tablespoon ground cinnamon
- 2 teaspoons vanilla extract
- 1 egg (beaten)
- 2 tablespoons sugar crystals or coarse sugar
Instructions
- Prepare the pie crust by mixing flour and salt, then adding cold butter until crumbly. Gradually incorporate ice-cold water, wrap the dough, and refrigerate for at least 30 minutes.
- In a separate bowl, combine sliced apples and cherries with brown sugar, cornstarch, cinnamon, and vanilla; stir gently until coated.
- Roll out half of the chilled dough into a circle and fit it into your pie dish.
- Fill the crust with the cherry apple mixture and roll out the remaining dough for the top layer.
- Bake in a preheated oven at 350°F (180°C) for about 70 minutes until golden brown.
Nutrition
- Serving Size: 1 slice (100g)
- Calories: 275
- Sugar: 22g
- Sodium: 150mg
- Fat: 12g
- Saturated Fat: 7g
- Unsaturated Fat: 4g
- Trans Fat: 0g
- Carbohydrates: 38g
- Fiber: 3g
- Protein: 2g
- Cholesterol: 28mg