Halloween Cake Pops
Add these spooky cake pops to your next Halloween party. Halloween Cake Pops are not only a fun treat but also a creative way to celebrate the season. Easy to make and decorate, these bite-sized delights can be tailored for various occasions, from kids’ parties to adult gatherings. The combination of cake, frosting, and colorful decorations makes them a standout choice that will impress your guests.
Why You’ll Love This Recipe
- Fun for Everyone: These Halloween Cake Pops are a hit with both kids and adults, making them perfect for any gathering.
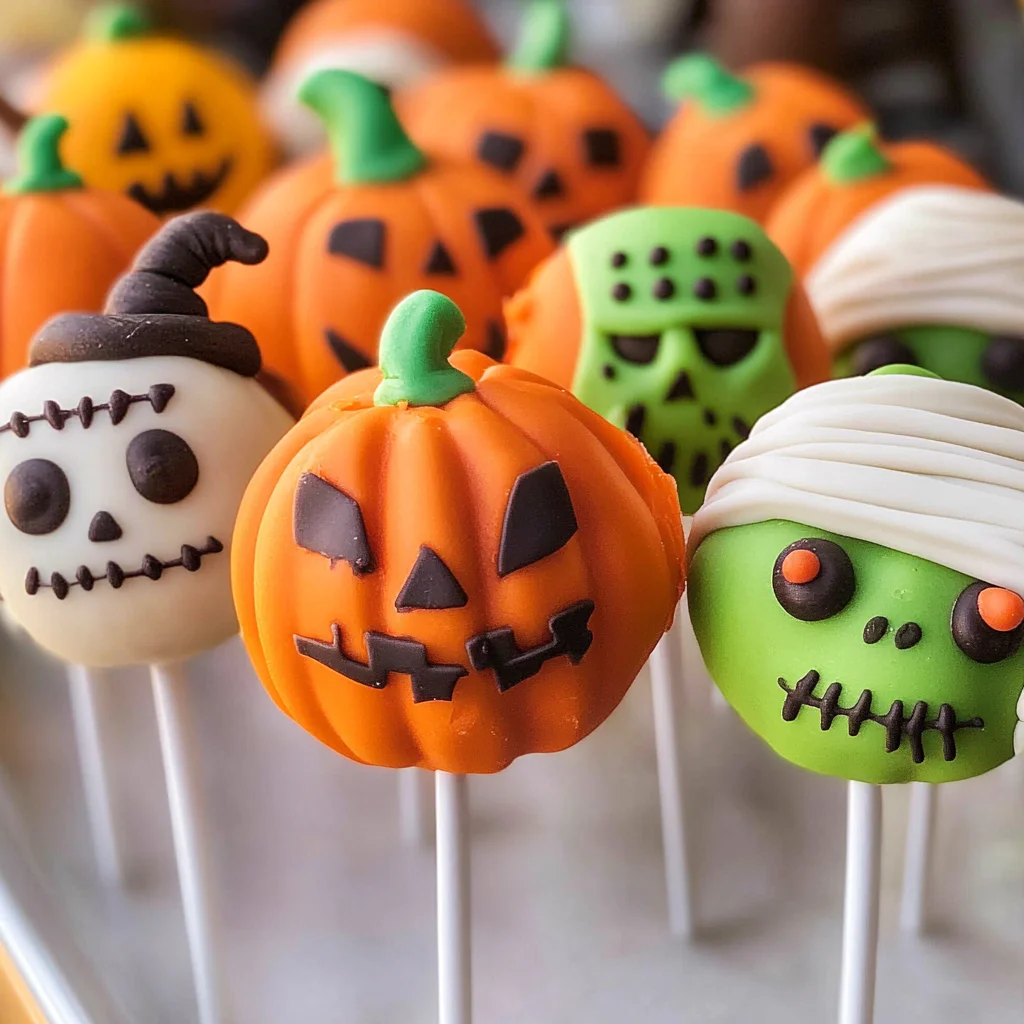
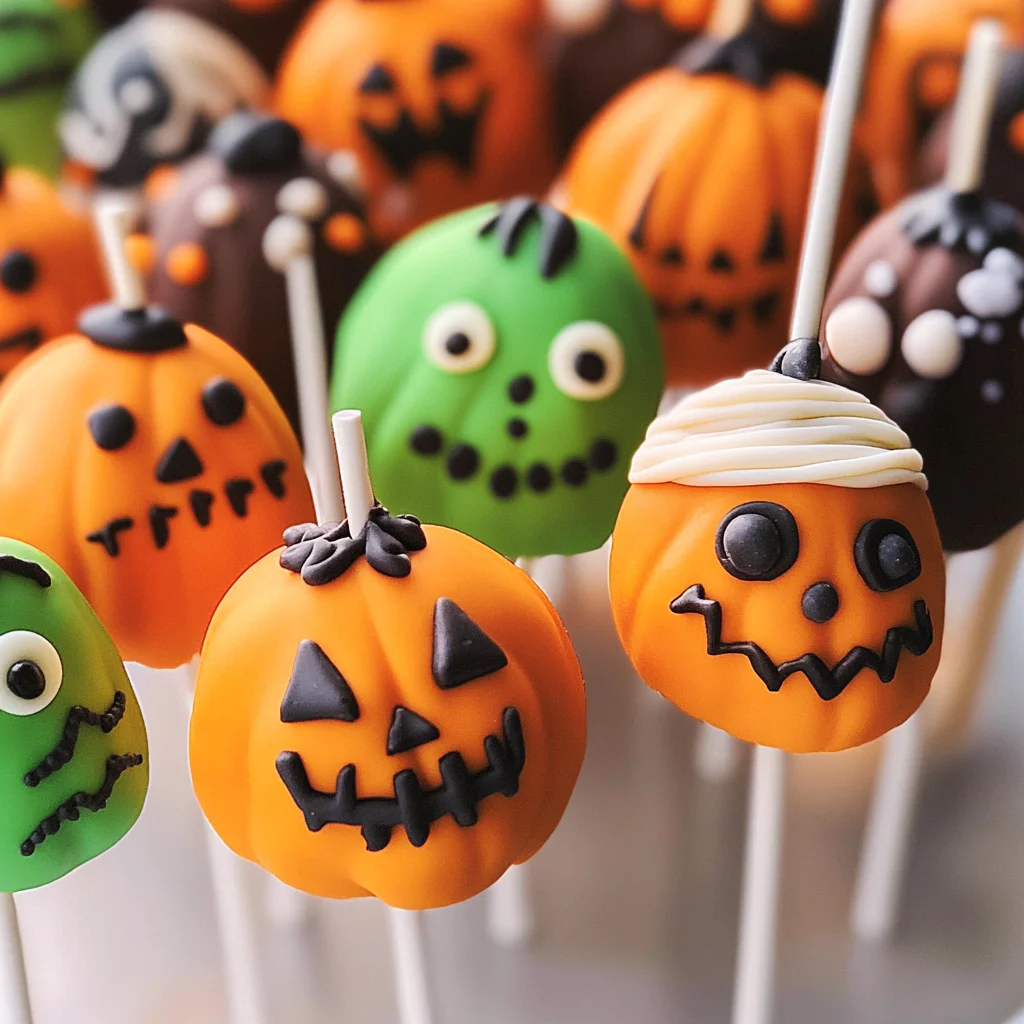
- Creative Decoration: Customize each pop as a Pumpkin, Frankenstein, or Mummy to add a festive touch to your spread.
- Delicious Flavor: With the option of vanilla or chocolate cake, you can cater to different taste preferences while keeping it delicious.
- Easy to Make: The simple steps mean you can whip up these treats quickly without stress.
- Perfect for Sharing: Their bite-sized nature makes them ideal for sharing at parties, ensuring everyone gets a taste.
Tools and Preparation
Before diving into this delicious recipe, gather the necessary tools. Using the right equipment will help ensure your Halloween Cake Pops turn out perfectly.
Essential Tools and Equipment
- Cake pan (13 x 9)
- Mixing bowls
- Electric mixer
- Cookie scoop or spoon
- Baking sheet
- Microwave-safe bowl
Importance of Each Tool
- Cake pan: A proper baking pan ensures even cooking and easy removal of the cake.
- Electric mixer: This tool saves time and effort when mixing your ingredients for the cake batter.
- Cookie scoop: It helps you form uniform cake balls for consistent size and appearance.
Ingredients
Add these spooky cake pops to your next Halloween party. Made with vanilla or chocolate cake, decorate these bite-sized pieces of cake for Halloween including a Pumpkin, Frankenstein, and a Mummy.
For the Cake
- 1 box Favorite cake mix
- 1 3.4 oz box instant pudding mix
- 4 eggs
- 1 cup water
- 1/3 cup vegetable oil
For the Decoration
- 1 cup Frosting
- Candy Melts
- Toppings – sprinkles, candy eyes
How to Make Halloween Cake Pops
Step 1: Preheat the Oven
Preheat your oven to 350°F. Spray your 13 x 9 pan with vegetable pan spray to prevent sticking.
Step 2: Mix the Batter
In a large bowl, combine:
1. Cake mix
2. Instant pudding mix
3. Eggs
4. Water
5. Vegetable oil
Beat at medium speed for about 2 minutes until well combined. Pour this mixture into the lightly greased cake pan.
Step 3: Bake the Cake
Bake in the preheated oven for 30-40 minutes or until a toothpick inserted in the center comes out clean. Allow it to cool in the pan for about 10 minutes before transferring it to a wire rack.
Step 4: Crumble the Cake
Once cooled, crumble the cake into a large bowl using your hands or two forks until no large chunks remain.
Step 5: Add Frosting
Add frosting to the crumbled cake and mix with your fingers until fully combined.
Step 6: Form Cake Balls
Using your hands or a cookie scoop, form the mixture into small balls and place them on a baking sheet lined with parchment paper.
Step 7: Chill the Balls
Chill the formed balls in the refrigerator for at least two hours so they harden properly.
Step 8: Melt Candy Melts
Melt Candy Melts in a microwave-safe bowl in 30-second intervals at half power until smooth.
Step 9: Insert Sticks
Dip sticks into melted Candy Melts and insert them into each chilled cake ball. Let them set; you can place them in the freezer for about 20 minutes to speed up this process.
Step 10: Dip in Candy Melts
Wait until candy is completely firm before dipping each pop completely into melted Candy Melts again.
Step 11: Decorate Your Pops
Sprinkle on your desired decorations like chopped-up candy, nuts, or sprinkles while still wet for an eye-catching finish!
How to Serve Halloween Cake Pops
Halloween Cake Pops make a delightful treat for any spooky gathering. Their fun designs and bite-sized portions are perfect for sharing. Here are some creative ways to serve them at your next Halloween party.
Spooky Dessert Table
- Create a themed dessert table featuring various Halloween treats, including your cake pops. Arrange them on a decorative platter surrounded by cobwebs and small pumpkins for an eerie touch.
Trick-or-Treat Bags
- Package individual cake pops in clear bags tied with orange ribbons. Hand these out as fun party favors or during trick-or-treating, making it easy for guests to enjoy on the go.
Halloween Party Platter
- Place the cake pops on a large platter with other Halloween snacks like fruit skewers or ghost-shaped cookies. This colorful display will entice guests and encourage mingling.
Interactive Decorating Station
- Set up a decorating station where guests can customize their cake pops with extra toppings like sprinkles, candy eyes, or melted chocolate. This interactive element adds fun to the festivities.
How to Perfect Halloween Cake Pops
Getting the perfect texture and appearance for your Halloween Cake Pops can elevate their appeal. Follow these tips for outstanding results.
- Use the right cake mix: Select a high-quality cake mix that suits your taste, whether vanilla or chocolate, for optimal flavor.
- Crumb properly: Ensure that your cake is crumbled finely without large chunks; this helps the frosting bind better and makes shaping easier.
- Chill before dipping: Refrigerate the formed cake balls for at least 2 hours before dipping in Candy Melts to keep their shape.
- Melt evenly: Heat Candy Melts gradually in 30-second intervals. Stir between intervals to achieve a smooth consistency without burning.
- Dip with care: Dip each cake pop slowly into the melted Candy Melts, allowing excess to drip off before placing them upright to set.
- Decorate quickly: Add toppings immediately after dipping while the candy coating is still wet to ensure they stick well.
Best Side Dishes for Halloween Cake Pops
Pairing side dishes with your Halloween Cake Pops can create a well-rounded party spread. Here are some suggestions that complement the festive theme.
- Ghostly Fruit Skewers: Assemble fresh fruit pieces on skewers and use mini marshmallows as ghosts at the top.
- Witch’s Brew Soup: Serve a warm and comforting green vegetable soup in small cups, perfect for sipping alongside sweet treats.
- Monster Veggie Platter: Arrange an assortment of colorful vegetables with hummus dip shaped like a monster face for added fun.
- Pumpkin Spice Muffins: Bake mini pumpkin muffins infused with warm spices; they provide a seasonal flavor that pairs beautifully with cake pops.
- Eyeball Pasta Salad: Create pasta salad using olives as eyeballs mixed with colorful veggies for a spooky twist on a classic dish.
- Creepy Crawly Cheese Board: Design a cheese board featuring assorted cheeses and crackers, garnished with gummy worms and spiders for an eerie effect.
- Cauldron Chili: A hearty vegetarian chili served in small bowls can be both warming and satisfying amid sweet treats.
- Spooky Popcorn Mix: Create a popcorn mix with candy corn, chocolate pieces, and nuts for crunchy bites that guests will love munching on throughout the event.
Common Mistakes to Avoid
When making Halloween Cake Pops, it’s easy to run into some common pitfalls. Here are a few mistakes to watch out for:
- Skipping the chilling step: Failing to chill the cake balls before dipping can result in them falling apart. Make sure to refrigerate them for at least 2 hours.
- Not crumbling the cake properly: Leaving large chunks of cake can make it hard to form smooth balls. Crumble the cake thoroughly using your hands or forks.
- Overheating the Candy Melts: Melting Candy Melts too quickly can cause them to seize up. Always melt in 30-second intervals and stir between each session.
- Using too much frosting: Adding excess frosting can make the mixture too wet, leading to sticky cake pops. Start with a small amount and gradually add more as needed.
- Neglecting decoration timing: Sprinkling decorations on melted candy after it sets will prevent them from sticking. Decorate while the candy is still wet for best results.
Storage & Reheating Instructions
Refrigerator Storage
- Store in an airtight container for up to 1 week.
- Keep layers separated with parchment paper to avoid sticking.
Freezing Halloween Cake Pops
- Freeze for up to 3 months in an airtight container.
- Wrap each pop individually in plastic wrap before placing in a container.
Reheating Halloween Cake Pops
- Oven: Preheat to 250°F and warm for about 5-10 minutes, keeping an eye on them.
- Microwave: Heat on low power in 10-second intervals; they should not be heated too long.
- Stovetop: Use a skillet on low heat, turning occasionally until warmed through.
Frequently Asked Questions
Here are some common questions about Halloween Cake Pops that might help you perfect your treats.
What are Halloween Cake Pops?
Halloween Cake Pops are bite-sized cake balls on sticks, decorated with fun Halloween themes like pumpkins, mummies, and monsters.
How do I make my Halloween Cake Pops look spooky?
To give your Halloween Cake Pops a spooky look, use colorful sprinkles, edible eyes, or different colored Candy Melts for unique designs.
Can I customize my Halloween Cake Pops?
Yes! You can customize flavors by using different cake mixes or adding flavor extracts. Decorations can vary based on your imagination!
How long do Halloween Cake Pops last?
When stored properly, Halloween Cake Pops last about one week in the refrigerator and up to three months when frozen.
Final Thoughts
These Halloween Cake Pops are not only festive but also versatile. With their fun shapes and colors, they make great additions to any celebration. Don’t hesitate to customize flavors and decorations according to your taste! Enjoy making these delightful treats!
Halloween Cake Pops

Add a festive touch to your Halloween celebration with these delightful Halloween Cake Pops! These bite-sized treats are not only fun to make but also perfect for both kids and adults. With the option of chocolate or vanilla cake, you can easily customize them to suit any taste. Decorate them as spooky pumpkins, creepy mummies, or ghoulish Frankensteins for a vibrant display that will captivate your guests. Simple to prepare and easy to share, these cake pops are sure to be the highlight of your party!
- Prep Time: 30 minutes
- Cook Time: 40 minutes
- Total Time: 1 hour 10 minutes
- Yield: Approximately 24 servings 1x
- Category: Dessert
- Method: Baking
- Cuisine: American
Ingredients
- 1 box favorite cake mix
- 1 3.4 oz box instant pudding mix
- 4 eggs
- 1 cup water
- 1/3 cup vegetable oil
- 1 cup frosting
- Candy melts (for coating)
- Toppings (sprinkles, candy eyes)
Instructions
- 1. Preheat the oven to 350°F and spray a 13 x 9 pan with vegetable spray.
- 2. In a large bowl, mix together cake mix, pudding mix, eggs, water, and oil at medium speed for about 2 minutes.
- 3. Pour the batter into the prepared pan and bake for 30-40 minutes or until a toothpick comes out clean. Allow cooling before crumbling.
- 4. Once cooled, crumble the cake in a bowl and mix in frosting until fully combined.
- 5. Form small balls from the mixture and place on a baking sheet lined with parchment paper.
- 6. Chill cake balls in the refrigerator for at least two hours.
- 7. Melt candy melts in intervals in a microwave-safe bowl until smooth.
- 8. Dip sticks into melted candy, insert into chilled cake balls, let set briefly.
- 9. Dip each pop in melted candy melts again and decorate with toppings.
Nutrition
- Serving Size: 1 cake pop (45g)
- Calories: 150
- Sugar: 12g
- Sodium: 120mg
- Fat: 8g
- Saturated Fat: 2g
- Unsaturated Fat: 5g
- Trans Fat: 0g
- Carbohydrates: 18g
- Fiber: <1g
- Protein: 2g
- Cholesterol: 35mg